Hello! This is my first Nail Files post, where I’ll feature the nails of a fellow mani fanatic. My premier feature is Megan, who is an awesome colleague of mine. We haven’t been working together for very long, but we instantly bonded over our love for nail polish. :)

Last week Megan told me about her planned girls night with her fellow gal pal and they were going to try out the Kiss Nail Dress decals. I’ve never used them myself, but have always seen them at the drug stores, so I was curious to see how they would compare to the Sally Hansen Salon Effects. One thing I noticed about the Kiss decals is the amount of bling options they have. I was excited to see which artwork Megan would be using on her nails.

If you haven’t used nail decals before you gotta give them a try. They’re the best when you’re in a hurry and forget to do your nails for a vacation or party. You can honestly even do them in the car on your way to an event! I love that you can have nail art on your fingers within 10 minutes and they stick on to your nails really well, strong enough to last up to 10 days. The best part is the removal process, all you need is regular nail polish remover and the decals come of with total ease. If you’d like to see a video on how to apply the nails, check out the Kiss Nail Dress website here.

So the day after Megan’s nail party she came to my desk and flashed her amazing hot pink leopard fingers… and toes! I never thought of using these for my feet and they are sooooo cute especially for sandals in the summer time. How adorable and fun!

I’m really excited to share more Nail Files posts with everyone! Lady friends, don’t be surprised if I ask to take a picture of your nails the next time I see you!

And thank you Megan for taking off your shoes for me!

xo,
e.

I went shopping at Zara a few weeks ago and picked up some amazing mint denim and a pair of crochet shorts, but after a few days of deliberation I decided that they were unnecessary and returned them back to the store. I mean who needs crochet shorts when the weather is only 17c and raining every other day? :/

A part of me still thinks about the shorts and I find myself green with envy when I see other girls wearing their mint denim, which led to inspiration for this mani post!

I love this New Bohemian mint shade from Colour Club. I’ve worn it once, all on its own without any bells and whistles, and loved how fresh it looked. It’s the perfect shade of blue / green for me as my skin color is quite tanned and I find pastels hard to wear.

The opacity is not the greatest, but all you need is a few good coats or a white bottom coat to help. The line stickers are from the Richmond Night Market last year and I can’t believe I never thought of using them before! They are so easy to apply and the adhesive is super strong. All I needed was two coats of Seche Vite and this mani has lasted me all week.

Pastels and crochet textures are so trendy right now. What’s your favorite look?

xo,
e.

After only three days my purple patterned nails began to chip. If you’re a nail polish fanatic like me, you try not to never leave the house with chipped polish. So, I had to remove and start fresh!

It’s way too cold and dreary for June right now. My apartment building manager even turned on the heat for us because it is just that chilly and wet! To offset all the grey going on with the weather I opted to go for some pretty pink hues and do an ombré design. In the past I’ve done my ombre by sponging one shade at a time, but I recently saw a different technique on Pinterest and decided to give it a try.

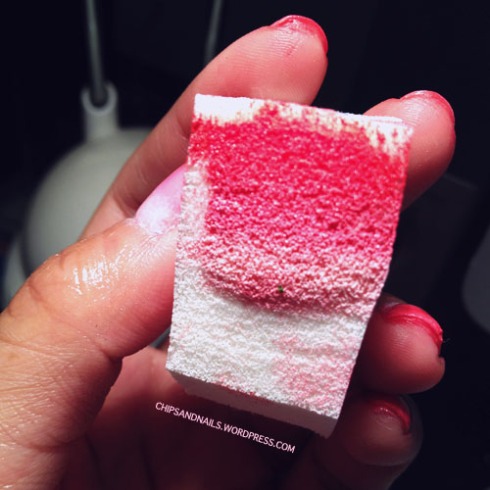
All you need is a makeup sponge, your 3 shades of color, a piece of paper towel, and a q-tip. I was worried that the color on the sponge wouldn’t go on a clear top coat so I cleverly painted on two quick layers of a nude as a base. For the pink hues I am using Revlon’s Coral Me WIld, Sally Hansen Insta-Dri Fuschsia Flare, and L.A. Girl Love Not.

Paint horizontal stripes on the sponge starting with your darkest shade and don’t be afraid to overlap the colors. This will help blend the shades together. I also recommend keeping the lines narrow in case you have smaller sized nails. After putting a medium sized amount of the colors onto the sponge, quickly dab the sponge onto your paper towel to remove any excess polish. Then place then sponge directly onto your nails and rock the sponge it ever so slightly from left to right to make sure the polish gets onto the edge of your nail. It can get a bit messy around your cuticles so make sure you have a q-tip and polish remove by your side to clean it up after. (Or you can tape around your nails using scotch tape, but I was too lazy tonight :)).

Image

This is a really quick way to do a nail design and I’m definitely going to use this technique again play around with different colors, not just shades of one color.

By the way, you will absolutely want a good top coat for this design as the sponge will leave a bit of a texture on your nail. Seche Vite is the best!

What are some of your favorite color combos right now?

xo,
e.

HOLY CRAP I can’t believe it’s been 6 weeks since I’ve posted. I had some really amazing birthday nails, but I didn’t have the time to post them up. Hopefully I still have the photos somewhere on some wireless device.

My boyfriend and I went to a friend’s wedding in Toronto last week and we decided to make a mini trip out of it and stay for 5 days. I was planning on doing something fun to represent the bride and groom as they’re some of our closest friends, but as per usual, I ran out of time and decided to go for a boring pink.

I was suddenly inspired tonight and opted for a random pattern mani with shades of purples (including pink and grey) and came up with what you see here.

Nothing too fancy, just some random patters and splash of glitter. :)

Whats your favorite color to theme with right now?

xo,
e.

Is it really that time again already? I’m talking ’bout PLAYOFFS!

Wednesday was the first game of the first round against the LA Kings and without a doubt I had to my nails to show my support. It was a last minute realization on the Tuesday evening so I quickly Googled “Canucks nails” and I found this image as inspiration (click here).

I quickly gathered my polish supplies, which consisted of Sally Hansens’ Hard as Nails Xtreme Wear in Blue It and Insta-Dri Whirlwind White. Luckily I also have my Sephora OPI nail design pens in a green and a white because they really helped with the details. And as for polishing tools all I used was a dotter and a very small brush.

And here you go, the final results! I was thinking of putting Luongo and Keser’s numbers on my thumbs because they’re my favorite, but 33 and 22 looked way better and the Sedins are the core of the Canucks so it’s only fair that I pay tribute to these awesome Swedes.

Left hand:

Right hand:

It took a lot of focus and patience to complete this mani and I have to say thanks to my boyfriend for excusing my turrets-like f-bombs when I messed up (which was a lot!) and putting up with the strong polish odour.

I leave you all with this: THE SHUFFLENUCK.

(You can see more of this amazingness here.)

HAPPY EASTER!

Easter is easily one of my favorite holidays and for the following reasons:

1. It happens in April, when the weather gets warmer.
2. We are guaranteed a holiday on Friday, which means after work drinks on Thursday and no work hangovers the next day.
3. Chocolates, chocolates, chocolates.
4. Family dinner(s).
5. And lastly, there is an abundance of inspiration for an Easter mani!

I gave the tribal nail thing a try a few months back, but I did such a crap job on it everyone thought I was practicing painting easter eggs on my nails in November. So this time around I totally took my time to prep my brushes, polishes, and design beforehand so they are legitimate tribal Easter eggs. I found the tutorial on YouTube and hopped right to it. Pun intended :)

I started this mani pretty late at night so I decided to keep the design consistent on each finger and started with Sally Hansen’s Insta-Dri Jade Jump, which is a great opaque minty jade shade. The reset of the design was created using Nail Art striper brushes in a light grey, black, and pastel pink. And of course I used my handy dotting tool to create the white dots with Sally Hansen’s Insta-Dri Whirlwind White.

I did all my lines first, going from cuticle to the tip then filled in the rest of the space with the vertical or dotting designs. I have to admit, I screwed up pretty bad on my left, which is my photo hand, so I had to redo and on some fingers, I even re-did them three times. :(

Well, here they are, and I absolutely loved them. They’re not as in-your-face as some other designs, which I think is perfect for Easter. I also received a lot of compliments over the weekend, including a bartender at a club, which totally made my day.

How do you normally spend your Easter?

xo,
e.

I must admit that I’ve been really slacking on my mani’s and I even gave my nails an entire week of rest without any polish except for OPI’s nail envy. But don’t worry, I’m back on it and will try to post more often!

I was surfing the interwebs for inspiration yesterday and came across a denim ombré inspired mani and decided to give it a try myself. I debated whether I wanted to do a pink or blue  and decided to go with the blue, staying true to the denim theme.

First I painted the white base with Sally Hansen’s Hard as Nails Xtreme Wear in White On. It took me 3 coats to make them look really even and opaque so I’m not sure if I would want to use this one again. White polishes are so hard to use! Then I dripped some Xtreme Wear in Pacific Blue onto a plastic plate to create the denim part of the mani. Using a make-up sponge, I sponged the blue very lightly starting from the tip of the nail until 2/3 was covered. I dabbed into some more blue onto the sponge and gradually made the tips darker to create the fullombré effect. Once the blue dried I decided to use Sephora by OPI’s matte top coat instead of a gloss top coat. I felt that this made the effect feel closer to denim.

This is maybe the second time I’ve ever worn blue nail polish and I still think it clashes with my skin tones, but at least they look cool! Well, I think so anyway :)

So besides chips, I also love indulging in a bit of froyo (which is what the cool kids call frozen yogurt). I had the chance to catch up with a good friend tonight over a cup of original tart at a nearby joint and got him to take a pic of my fresh nails (which I Instagram’d):

What’s your latest nail art inspiration?

xo,
e.


Oh hello! The weather in Vancouver has continued to stay cold, wet, and windy, which means spring is still not here. But because I have such an amazingly positive attitude I decided to do some spring time nails and brighten up my days with a splash of floral.

I find that the vintage rose design can look super pretty like old porcelain china or very “abstract”. I’ve given it a try in between polish changes in the past, but have never actually fully committed to it for this exact reason. This is definitely one of those mani’s when I’ll tell everyone to look far away, not up close :).

I started off with Sally Hansen’s Insta-Dri Jade Jump then made 3 or 4 dots of Insta-Dri’s Pink Blink. The pink is the center of the rose and helps create contrast with the vintage petals, which I created with my favorite China Glaze China Rouge.

With a very small and thin brush I painted three loose and light red petals around my pink dots and smudged some of the red into the pink to help blend the colors. Once the flowers dried, I used my bright green Art Club striper to paint on short little petals. And just like that, spring has sprung on my nails!

What are some of your favorite colors for this upcoming spring season?

xo,
e.

PS: I was in Seattle for work this week and during some after work bevvies, I noticed that the petals of my nails glowed in the dark! Here is a not so great iPhone pic. I love nail polish surprises!

OMG I am an awful blogger. It’s taken me way too long to write a new post. Apologies to my 0.5 followers.

This mani started out a simple v-split paint job with Color Club’s Nomadic in Nude as the base, which I used to paint several coats. When the base dried, I taped the V shapes that I wanted using masking tape then painted on VooDoo You Do to create the dark contrast. I love this look. It went well with everything I wore and I think they were good season color choices during this in-between period as we wait for spring to arrive.

A week later, while I was sitting on my couch watching TV, I looked at my mani during commercials and wondered if I should scrap them and do something new or…? Then suddenly a big wave of laquer inspiration hit me! I remembered that I had purchased a string of ball chains from the Japanese dollar store and decided to trim the V’s with them.

The chain came in one long strand so I had to measure each side of the V’s, cut them, then used a clear top coat to glue them on. I think they look quite beautiful, don’t you? Too bad they lasted about an hour before they all fell off as I changed from sweat pants to jeans. So sad. :(

Does anyone have suggestions on what to use to glue things onto nails? I’m afraid to use nail glue because I feel like it might be too harsh, but a clear top coat is just not strong enough!

xo,
e.

Holy moly did Valentine’s Day creep up on us or what? I can’t believe we’re already half way through February. Wasn’t it just NYE like two days ago? Well either way, V-Day is here and that means a holiday themed mani!

This one was a bit hard for me because I’m not the type to get super excited over V-Day so there wasn’t a lot of inspiration bubbling in my head. I’ve learned in the past that the higher the expectations, the higher the disappointment when it comes to this “holiday”, but that’s not to say that my bf and I don’t do nice things for each other. He may not be a Ryan Gosling from The Notebook, but I have to say that he does try more than I give him credit for. For example, instead of making a lasagne, he bought me a lasagne from Costco after hearing that I was craving for it lol. :) Anyway, Valentine’s is also hard for us to plan because we’re always so busy with our own lives!

I rummaged through my polish bins and found this super cute pink by Sally Hansen Insta-Dri called Fuchsia Flare and remembered about the awesome silver hearts I bought from the Japanese dollar store a few months ago. After sticking them on my ring finger, I dotted a heart around the bundle of love. Voila, my Valentine’s Day nails! Simple, but cute. Just like my perspective on the pseudo holiday :)

What are you doing for Valentine’s Day?

xo,
e.